

Benefit Cosmetics
Nail Art inspired by Benefit Cosmetics
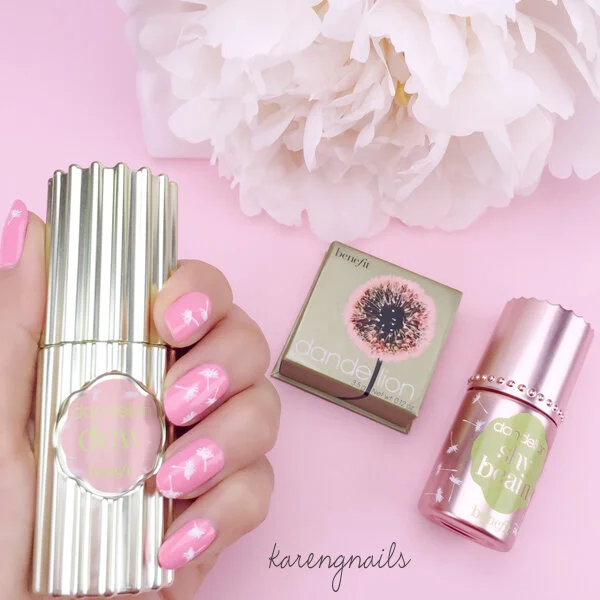
Benefit Cosmetics Dandelion Dew and Shy Beam inspired nail art by Karen G Nails Karen Gutierrez
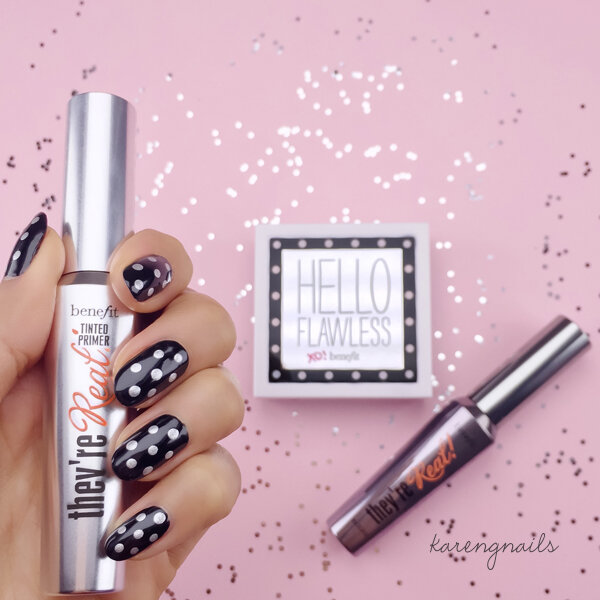
Benefit Cosmetics they're Real mascara and Hello Flawless inspired nail art by Karen G Nails Karen Gutierrez
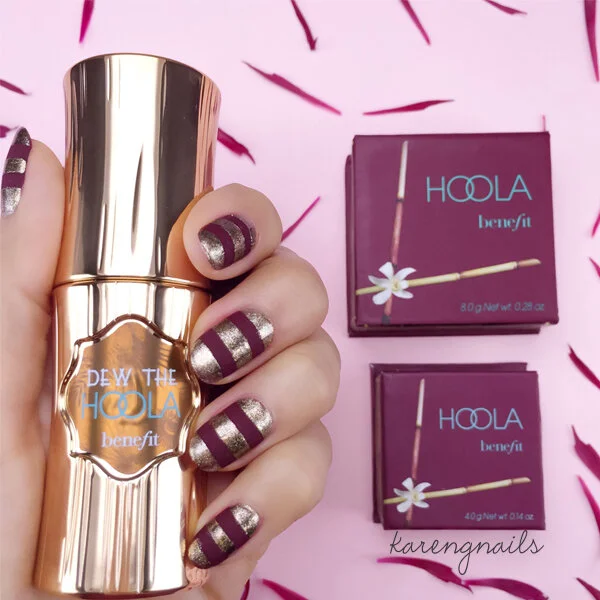
Benefit Cosmetics Hoolah Bronzer inspired nail art by Karen G Nails Karen Gutierrez

karen g nails signature
Benefit Cosmetics Dandelion Collection featuring:1. Dandelion Shy Beam Matte Liquid Highlighter - This soft-matte, nude pink highlighter gives off a natural-looking radiant shine.2. Dandelion Brightening Powder - This ballerina-pink face powder is perfect on the cheeks or over face as a brightening finishing powder.3. Dandelion Dew Liquid Blush - This is the prettiest natural baby-pink blush and gives cheeks a dewy, delicate pink glow.Benefit Cosmetics mascara and foundation featuring:4. Hello Flawless! Powder Foundation - Benefits most famous powder cover-up glides on naturally sheer and layers beautifully for customized coverage.5. they're Real! Lengthening & Volumizing Mascara - This long wearing jet black mascara lengthens, curls, volumizes, lifts and separates.6. they're Real! Tinted Primer - Tint, define and prime lashes! Wear primer alone to give lashes a feathery, natural look or wear with they’re Real mascara to dramatically boost length & separate lashes.Benefit Cosmetics Hoola collection featuring:7. Dew the Hoola Liquid Bronzer - This soft-matte liquid bronzer gives your face a smoothing effect and a shimmerless glow for a natural look.8. Hoola Matte Bronzer Powder - One of my most favorite matte bronzing powders. The perfect contour and bronzer for a natural-looking tan.
OPI SoftShades
 OPI SoftShades collection comes with six softly shaded gorgeous pastels inspired by the Spring 2016 runways. Suzi Weiss-Rischmann says, this collection is offering a fashion-forward interpretation of the pastel palette instead of the expected sheer and muted look. The lacquers have a finish that adds a ‘mod’ element to their shades.
 OPI SoftShades collection features six softly shaded pastels which include:
- Stop it I'm Blushing
- It's in the Clouds
- This Cost Me a Mint
- One Chic Chick
- I Am What I Amethyst
- It's a Boy!
 All of the pastel colors in this collection had full coverage after just two coats...love! After swatching the entire collection my absolute favorites are ‘I Am What I Amethyst’ and ‘It’s a Boy!’ Perfect for anyone expecting a baby boy :)OPI SoftShades 2016 Pastels are available in Nail Lacquer and GelGolor formulas at professional salons, beauty brands, Charters, Dillards, Regis and ULTA.[show_shopthepost_widget id="1573479"]
Nails Inc Paint Can Spray Can Nail Polish
 I’m excited to share with you all the latest product from Nails Inc London Paint Can Spray Can Nail Polish! I was immediately intrigued by the product and couldn’t wait to try it.The color I tested was Mayfair Lane which is a light pink almost white with a hint of shimmer.I followed their step by step guide and directions. I noticed the spray can nail polish dried fast and had full coverage with just the first spray. However, I tend to like my nails more opaque so I sprayed a second coat. It was really the perfect polish application. The polish I sprayed on my fingers washed off pretty quick and easy. Be careful when applying the base coat. I wasn’t too careful when I applied the base coat to my nails and accidentally got some on my cuticles. So, I had to clean up around my cuticles.I decided to include my own step by step guide below with their directions along with my images. I hope the guide below makes it easy for you to achieve the perfect polish application using Nails Inc Paint Can Spray Can Nail Polish.Products:Nails Inc Paint Can Spray Can Nail PolishNails Inc 2 in 1 Base and Top Coat
 Steps:Step 1Apply base coat and allow time to dry. (Nails Inc. recommends 2 in 1 base coat and top coat)Step 2Shake Paint Can and spray the polish from a distance of 10-15 cm directly onto the nails. If needed spray a second coat of polish. Allow nails to completely dry.Step 3Apply a top coat and allow time to dry. (Nails Inc. recommends 2 in 1 base coat and top coat)Step 4Fill bowl with soapy water and wash away and gently rub excess polish from the skin and cuticles. If needed use a small concealer brush dipped in nail polish remover to clean up around the cuticles.Step 5Finally, perfectly applied polish! [show_shopthepost_widget id="1556780"]
Formula X Delete All Nail Polish Remover
Formula X Delete All Nail Polish Remover is a quick and convenient nail polish remover with a pre-soaked five-finger sponge. I was excited to test this product, but I have to admit I was skeptical at first. I’m used to cotton pads and nail polish remover. I was worried about “soaking” my nails. Thus, I was afraid I would have to soak them for a long time before I saw any results. I was surprisingly amazed by this product! This nail polish remover is in fact instant and the results were faster than expected. In less than one minute my nails were completely clean.I simply dipped my fingers into the 5 five holes. I “soaked” my nails for 10-30 seconds while rubbing my fingers back and forth against the sponge. Finally, I removed my fingers and my nails were completely clean. I washed my hands and moisturized them right after. This product is perfect for those of us who love painting our nails, but dread taking the nail polish off. I like products that save me time and make my life easier. Plus there was no mess to clean up. It’s worth every penny! It’s now on my must-have products list. In the video above I used Nars in Purple Rain and did an amazing job removing a dark polish. I have yet to try removing glitter nail polish, but I’m sure it will get the job done in an instant. I would not suggest traveling with this jar since you run the risk of spilling. However, I would keep this at home and even suggest removing your polish at home before your next nail appointment to save you and your nail tech time :) Just remember to wash your hands before your next polish application.Available at Sephora and sephora.com
I would love to know who else has tried Formula X Delete All Nail Polish Remover?
Jessica Cosmetics Pop Couture Spring 2016

Jessica Cosmetics Pop Couture Spring 2016 Collection
 Jessica Cosmetics Pop Couture Spring 2016 Collection is a collection that blends the best of couture and popular culture. This collection features six amazing bright colors which include:
- Fashionably Late
- Pop Princess
- Glam Squad
- Runway Ready
- IT GIRL
- Strike A Pose
I was impressed by the colors in the Pop Couture collection. The colors were bright compared to the light pastel nail colors I’m used too seeing for Spring. However, this bright collection was still subtle for spring. Also, it's the perfect collection to transition from Spring-to-Summer. The formula is quite sheer so most of these shades will need two coats to achieve full coverage and a top coat for shine. I used four shades from the Jessica Cosmetics Pop Couture Spring 2016 collection to create this colorful Mickey Mouse nail design for my recent trip to the Magic Kingdom!
What are your favorite shades for Spring?
Art Deco Nails
 I was inspired by art deco when I first created this nail look last year. I loved it so much and promised many of you to do a quick tutorial and show you exactly how I did it. The steps are easy and these art deco nails can easily be done! I will admit my biggest nemesis when it comes to nails is the amount of time it takes for nail polish to dry. I’m trying to learn to be more patient and accept the fact that I need to let my nails dry in between each step…it’s not easy but it can be done! My solution is watching my favorite YouTube beauty gurus in between each step for these art deco nails :) Remember this art deco nails design can be done in any color combination you like so...get creative!
 Tools:Essie - LicoriceZoya - RockyCiate - Power Dressing 063Seche Vite - Top CoatGold Striping TapeNail Art Liner BrushStep 1Apply two coats of Zoya ‘Rocky’ allow time to completely dry.Step 2Using the liner brush paint two black lines using Essie ‘Licorice’ starting at the sidewall of the nail and painting towards the free edge in order to create the perfect peak where the two black lines will meet.
Step 3Fill in the the sides using Essie ‘Licorice’.Step 4Using the liner brush paint two lines using Ciate ‘Power Dressing 063’ starting at one side of the free edge painting towards the middle and drawing another line on the other side painting towards the middle until both lines meet and create a ‘V’.Step 5Fill in the ‘V’ using Ciate ‘Power Dressing 063’ allow time to dry.Step 6Apply two pieces of gold striping tape to outline the ‘V’ shape that was just created. Finally, lock in your art deco nails design by applying one coat of Seche Vite Fast Drying Top Coat.
Tools:Essie - LicoriceZoya - RockyCiate - Power Dressing 063Seche Vite - Top CoatGold Striping TapeNail Art Liner BrushStep 1Apply two coats of Zoya ‘Rocky’ allow time to completely dry.Step 2Using the liner brush paint two black lines using Essie ‘Licorice’ starting at the sidewall of the nail and painting towards the free edge in order to create the perfect peak where the two black lines will meet.
Step 3Fill in the the sides using Essie ‘Licorice’.Step 4Using the liner brush paint two lines using Ciate ‘Power Dressing 063’ starting at one side of the free edge painting towards the middle and drawing another line on the other side painting towards the middle until both lines meet and create a ‘V’.Step 5Fill in the ‘V’ using Ciate ‘Power Dressing 063’ allow time to dry.Step 6Apply two pieces of gold striping tape to outline the ‘V’ shape that was just created. Finally, lock in your art deco nails design by applying one coat of Seche Vite Fast Drying Top Coat.
I hope you’ve enjoyed my art deco nails inspired tutorial and I can’t wait to see your nails!
Strike Gold Nails Tutorial
 I love GOLD! My eyes are immediately drawn to anything in gold. I’ve realized that most my accessories and jewelry are in gold or have at least a touch of gold. So, when I think about my nail designs I try my best to incorporate gold elements into my design.I re-created one of my favorite and simple gold nail looks. Creating this easy Strike Gold Nails Tutorial. This nail look can be done in any base color you prefer! In 4 easy steps you can also strike gold!
 Tools:Deborah Lippmann - Modern LoveElla + Mila - GildedStriping TapeSeche Vite - Top CoatStep 1Apply two coats of Deborah Lippmann ‘Modern Love’ allow time to completely dry.Step 2Cut and apply two pieces of striping tape starting on the sidewall of the nail and taping toward the base of the nail to create the perfect ‘V’.Step 3Fill in the ‘V’ with Ella + Mia 'Gilded' and carefully remove the striping tape while polish is still wet.Step 4 Finally, lock in your nail design by applying one coat of Seche Vite Fast Drying Top Coat.
I hope you enjoy the tutorial below and create amazing strike gold nails!
CHANEL LE VERNIS NAIL SWATCHES
Chanel LE VERNIS Longwear Nail Colour
and LE GEL COAT Longwear Top Coat
Nail Swatches
 I was so excited to test and swatch the newest collection from Chanel, LE VERNIS Longwear Nail Colour. The colors have been reformulated for a longer lasting, high-shine, 5-free and newly enriched with Bioceramics and Ceramides. I’m impressed by all the colors in the reformulated collection. The new formula is creamy and highly pigmented. I love the amount of full coverage most these shades give after just one coat and the amount of shine with the Le Gel Coat top coat.
 After using the product I noticed my manicure lasted longer with the new LE GEL COAT Top Coat. I’m happy to report there were no chips and only a slight amount of tip wear after just 5 days! I wanted to mention that everyone thought I had gels on, that’s how amazing the shine is with the new LE GEL COAT! I described in my previous post that the Top Coat is activated by natural light that bonds to the nail color for flexibility, strength and unprecedented wear. Therefore, Chanel says there's no need for a UV lamp to end up with a glossy gel-like finish and I agree! The top coat is thicker and you may need to go back to your bottle once more for product to cover your entire nail. I’ve had many people ask me if it’s a fast drying top coat, even though it’s not marketed as a fast drying top coat I have noticed that it dried my nails really quick!I’m excited to hear your thoughts on Chanel’s new formula and top coat. I would love to know which is your favorite Chanel Le Vernis Nail Swatches shade below!
 The new Chanel LE VERNIS Longwear Nail Colour collection and LE GEL COAT Longwear Top Coat are available at Chanel.com, Nordstrom, Bloomingdales, Neiman Marcus, and Macy’s for $28.
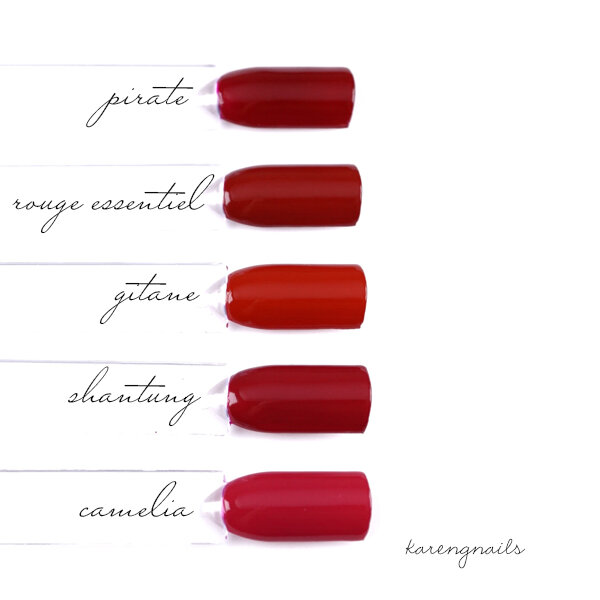
 PIRATE - The perfect vampy red and one of Chanel's bestselling cult favorites.
 ROUGE ESSENTIEL - My new favorite red! This shade is very similar to Chanel's 'Dragon' which is my go to red polish.
 GINATE - Is a cute poppy red-orange and their brightest red in this collection.
 SHANTUNG - Gorgeous shade and a cross between magenta and a deep raspberry color.
 Camelia - The richest pink with a hint of blue.

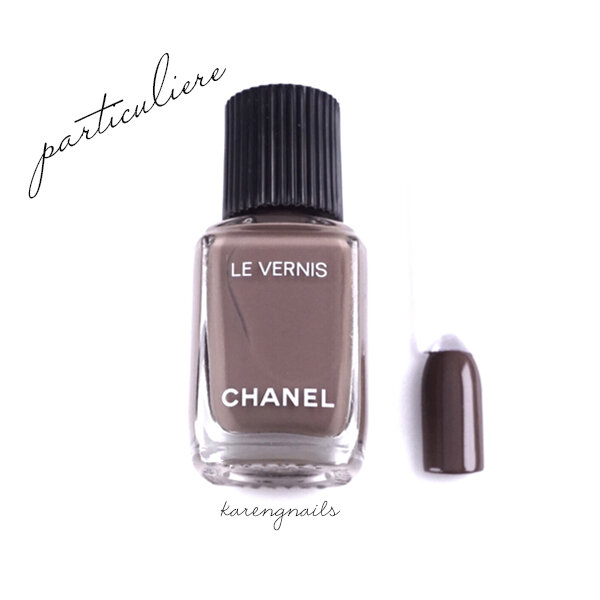 PARTICULIERE - One of my personal favorites! I haven’t come across a color that compares to this shade, it’s my favorite taupe polish. This color looks different on every client I've put it on, but compliments every skin tone.
 GARCONNE - You don’t see too many colors like this around, but thankfully for Chanel theres now a greenish grey.
  MONOCHROME - I would recommend everyone to have a shade of grey in their collection and this is such a good light grey for every skin tone.
 ORGANDI - This is the perfect full-coverage rosy nude shade for spring.
  BALLERINA - A true classic Chanel shade! My clients personally request this soft pale pink shade all the time.

 MYTHIQUE - A dark burgundy polish that I fell in LOVE with at the #COCOLOVESLA beauty lounge event this past weekend in Los Angeles. This is a color I normally wouldn't wear, but I decided to give a try and I'm glad I did. I immediately fell in love when the lovely manicurist at Olive and June applied it perfectly.
 VAMP - This color will never go out of style! This edgy black-red polish has been rocking since its debut in the 1990’s.
 ROUBACHKA - Is a deep purple almost black shade. Initially very sheer with one coat, but perfect with two coats.
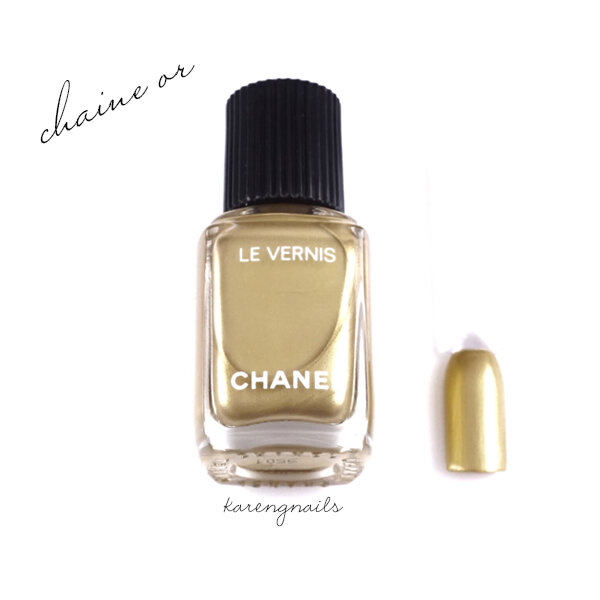 CHAINE OR - My dreams came true! Chanel released a GOLD polish and it’s gorgeous. Two coats gives you a good amount of coverage, but three coats makes it the perfect gold.*Unfortunately, I could not swatch Rouge Noir or Mariniere, but these shades are available in the new formula.
#ILOVECOCO
I wanted to thank Chanel and Elizabeth Fraise for inviting to attend #COCOLOVESLA beauty lounge event at the Chateau Marmont. I had an amazing time at the event with Stephanie Stone from the Photo Booth to and getting our nails done by the sweetest manicurists over at Olive & June, thank you Sarah and Ashlie Johnson! I wanted to share with you all a couple of pictures I took at the event just incase you missed my snaps. *The color I'm wearing is Mythique by Chanel :)

#ILOVECOCO Chanel LE VERNIS
#ILOVECOCO
CHANEL LE VERNIS
 Chanel sets the standard when it comes to fashion and beauty. Theres no question that Chanel sets trends and throughout the years LE VERNIS style-defining shades have done exactly that.
 I’m excited to share with you the newest collection from Chanel, LE VERNIS Longwear Nail Colour. The formula has been reformulated for a longer lasting, high-shine, 5-free and newly enriched with Bioceramics and Ceramides.
 The formula is set to deliver protective benefits that will strengthen nails and improve the quality of nails over time and selected pigments that offer an even application for a more dramatic lacquered look.The most important step in any manicure is the Top Coat! Chanel has a new LE GEL COAT Longwear Top Coat that extends the wear of LE VERNIS for up to 7 days and will provide a glossy, gel-like finish!How does this work? The clear Top Coat is activated by natural light and bonds to the nail color for flexibility, strength and unprecedented wear.Therefore, Chanel says there’s no need for the UV lamp or the damage to end up with a glossy, gel-like finish.
 Chanel LE VERNIS Longwear Nail Colour comes in 16 shades:SHANTUNGBALLERINA*PIRATE*ROUGE ESSENTIELMONOCHROMECAMELIAORGANDIVAMP*MYTHIQUEROUBACHKAMARINIEREGITANECHAINE ORPARTICULIERE*GARCONNEROUGE NOIRE*[*Bestsellers]
 I’m excited to share with you the new formula from Chanel LE VERNIS Longwear Nail Colour collection and go through the quick and easy steps to achieve the perfect ultra-glossy gel-like finish manicure using Chanel products.
 Step 1Apply one thin layer of Chanel LA BASE PROTECTIVE AND SMOOTHING base coat.
 Step 2Apply two coats of think coat of Chanel LE VERNIS Colour in Rouge Essentiel.
 Step 3Finally, lock in the color using Chanel Le Gel Longwear Top Coat to achieve the perfect gel-like finish.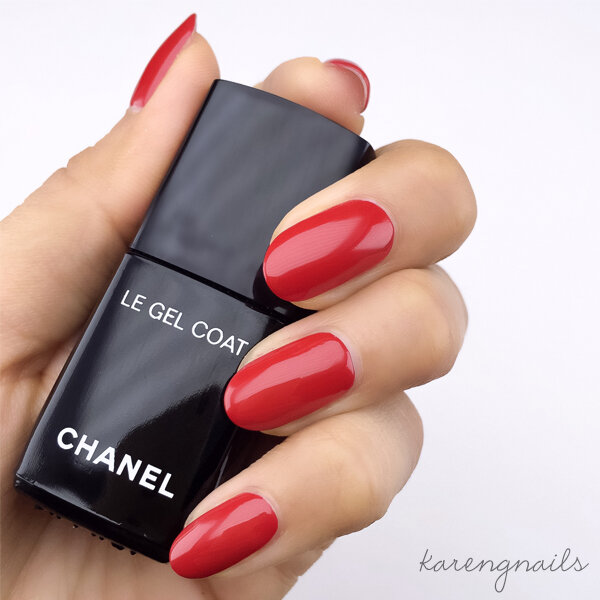
#COCOLOVESLA
CHANEL “I Love Coco Backstage Beauty Lounge”
Go to the link below for a special backstage all-access invite from CHANEL and reserve a spot for you and your friends in advance #COCOLOVESLA Visit: http://bit.ly/ilovecocoeventWhen:Friday, February 26-28Noon - 7pm dailyWhere:Bar Marmont at the Chateau Marmont - 8171 Sunset Boulevard, Los Angeles, California
#COCOLOVESLA
Valentine's Day
 Valentine’s Day is just around the corner and I hope everyone has a special Valentine for this weekend! In the spirit of LOVE, I thought it would be a cute idea to make a Valentine’s Day inspired nail art tutorial.You know the saying, ‘I wear my heart on my sleeve’?… well, I prefer ‘I wear my heart on my fingertips’ Therefore, that was the sheer inspiration for this nail look.I hope you enjoy this Valentine’s Day nail art tutorial and remember to give and receive love everyday of your life!
 Tools:Essie - MinimalisticOPI - Hello Kitty 5 Apples TallDetailing Nail Art BrushDotting ToolSeche Vite - Top CoatSteps:Step 1Apply two coats of Essie ‘Minimalistic’ allow time to completely dry.Step 2Using a dotting tool dipped in OPI ‘5 Apples Tall’ dot 6 circles in the shape of heart to achieve the best heart.Step 3Using a small nail art brush dipped in OPI ‘5 Apples Tall’ connect the dots to form the outline of the heart.Step 4Fill in the heart using OPI ‘5 Apples Tall’.Step 5Finally, lock in your Valentine’s Day nails by applying one coat of Seche Vite fast drying top coat.
Happy Valentine’s Day!

Christmas Gift Guide
 Happy Holidays! It’s almost Christmas and I’m so excited to spend it with my family! I love spoiling all my loved ones, therefore, I’ve been doing a lot of last minute shopping. Finding the perfect gift can be stressful and I tend to ask my friends for gift ideas.My friends always ask me what my favorite nail products are and I send them a list of all my must have items. So, I decided share my list with you and create a christmas gift guide including my favorite products!The products below are not only on my christmas wish list but I love them all year round!If you have a friend, sister, mom, girlfriend or family member that loves nails…the following products will be the perfect addition to their nail kit. I swear by these products and I wouldn’t be able to do my nails or client nails without them.I hope this christmas gift guide helps anyone doing last minute shopping for the nail lover or nail artist in your life…or yourself :)
Christmas Gift Guide
1. OPI DripDryLacquer drying drops that dries nails to the touch in one minute and completely in five minutes. $5.752. Zoya Remove PlusBig Flipper Polish Remover is a 3-in1 nail polish remover, nail prep, and nail conditioner. $9.993. Essie Million NailsFor visibly stronger nails with iron and amino acids that helps resist peeling and splitting nails. $104. H. Gillerman Remedy Pack Organic essential oil remedies designed to address and provide therapeutic relief. Includes Sinus Remedy, Stress Remedy, Sleep Remedy, and Tension Remedy. $160 a $220 value5. Formula X Bottle Service SetLimited-edition 10-piece mini nail polish set with the best selling bold and neutral shades packaged in a cute champagne bottle. $36.506. Sephora Crystal Nail FileLong-lasting crystal nail file that perfectly sculpts your nails and easily fits in your purse for on-the-go filing. $107. Seche Vite Dry Fast Top CoatThis top coat dries fast and protects your nail color from chipping or peeling. $4.918. Henri Bendel Brown & White Nail Polish PouchPerfect organizer pouch for your favorite polishes and nail accessories. $389. Chanel Le Top Coat VelvetLimited-edition top coat that transforms any nail polish color into a matte finish. $2710. Sally Hansen Clip ’N CatchPerfect nail clippers featuring a wider blade and contoured handle for a controlled grip. Plus no more mess with their built in clippings catcher. $2.2911. Tweezerman Ultra Precision Cuticle NipperFeatures sharp, long-lasting snipping tips for smooth cutting. $3512. Lush Lemony Flutter Cuticle ButterCuticle cream thick enough to soften dry, cracked cuticles and rough skin.$17.95
Happy Holidays!
Christmas Red Stocking Nails
 I love christmas stockings! I especially love surprising all my loved ones with red stockings filled with their favorite items. Stocking stuffers are my favorite items to shop for and I always make sure to include an item they can use either on their hands or feet :) For example, some of my favorite stocking stuffers include nail polish, crystal nail files, cuticle oil, nail clippers and fast-drying top coat. I was inspired by all of my christmas stockings to create red stocking nails. Below is a quick and simple nail tutorial to add just a tiny bit of holiday cheer to your nails this season!
 Materials:L’Oreal Extraordinaire Gel-Lacque 1-2-3 - Red-y to Shine?OPI Infinite Shine - Non-Stop WhiteStriping TapeSeche Vite - Top CoatStep 1Use a white and red nail polish to create your red stocking nails.Step 2Apply two coats of OPI Infinite Shine ‘Non-Stop White’ allow time to completely dry.Step 3Apply a piece of striping tape 1/4 away from the base of the nail to create the perfect horizontal line .Step 4Fill in the portion above the striping tape with L’Oreal Extraordinaire Gel-Lacque 'Red-y to Shine?'Step 5Carefully remove the striping tape while polish is still wet.Step 6Finally, lock in your red stocking nails by applying one coat of Seche Vite fast drying top coat.
 I hope you enjoy hanging your stockings and all your sweet stocking stuffers this Christmas!
’Tis the season for Glitter!

Marc Jacobs - Glinda
’Tis the season for Glitter!The Holidays are here and what’s more appropriate than glitter for this season.Glitter is perfect for all the holiday parties and puts you right in the mood for New Years!I love the sparkle, shine, and shimmer…it’s like a mini celebration right at your fingertips!I take full advantage of the Holiday season by wearing all my favorite glitter nail polishes. My pick of the glitter was…Marc Jacobs nail lacquer in Glinda!Glinda has definitely made my list of favorite silver glitter nail polishes. I was able to achieve full coverage with only two coats of polish…amazing!Skip the jewelry and deck out your fingernails with a little bit of glitter and let your fingernails be your best accessory this season.Bring on the GLITTER…
JINsoon Chinoiserie Collection

JINsoon Chinoiserie Collection
 Just in time for the holidays Jin Soon creates the JINsoon Chinoiserie Collection. The Holiday 2015 collection was inspired by the 17th century French design style chinoiserie. Jin Soon Choi says, she was drawn to the elegant hues and design used in Chinoiserie décor and jewelry.This elegant collection features three gorgeous nail polishes that capture the “Chinese-esque” elements in its holiday collection.
 Glacé - Glitter polish with a mix of gold, silver and blue glitters.
 Cachet - Light Gold shimmer polish.
 Opulence - Red polish with a hint of metallic dust.
 I was immediately drawn to the shade of Opulence and just like it’s been described this red is truly striking and romantic, its the perfect red for a Holiday collection.
 A Holiday collection is not complete without some glitter! I was thrilled to see a gold glitter polish in this collection. I was surprised when I noticed that Glacé polish had a mix of gold and blue glitter.
 I wanted to create a holiday nail look using both lacquers Glacé and Opulence from JINsoon Chinoiserie collection by doing a glitter ombre. I noticed Glacé had a good amount of coverage with only one coat of polish. The mix of different sized gold and blue round glitters gave this holiday nail look that extra sparkle.
Ombré Nails

Ombré Nails
One of my favorite nail looks at the moment is Ombré nails. I love doing ombré nails because the color combinations are endless. However, it was once one of the messiest nail looks. The first time I ever did ombré nails I spent over 10 minutes trying to clean up all of the nail polish around my cuticles. So, I tried using scotch tape and Elmer's glue around my cuticles, but none of these methods quite worked for me. I still had a lot of clean up to do and I noticed the nail polish remover was drying out my cuticles!In effort to solve this issue, I started using Dr. Hauschka Neem Nail Oil around my cuticles. This method killed two birds with one stone! The cuticle oil made clean up so much easier with less nail polish on my skin. Plus it didn't dry out my cuticles or fingers. Ever since then creating ombré nail looks has been so much easier.How do I get the ombré effect? To create my ombré nails I use the make-up sponge technique. Below I created a tutorial with all of the steps I use to create ombré nails. Materials:LVX - MyntLVX - FemmeMakeup SpongeDr. Hauschka Neem Nail OilSmall Concealer BrushSeche Vite - Top CoatStep 1Choose two nail polish colors to create your ombre. Unscrew the lids of the polish and leave them open.Step 2Apply two coats of LVX - Mynt allow time to completely dry.Step 3Apply three coats of LVX - Femme to half of the makeup sponge and two coats of LVX - Mynt to the other half.Step 4Using a small concealer brush carefully apply cuticle oil all around the sides and cuticles. Apply one single coat of LVX- Femme toward the middle of the makeup sponge to blend the two colors together.Step 5Grab the sponge and place it directly in the middle of the nail, then gently apply pressure while rocking the sponge back and forth in the same spot. Re-apply the nail polish colors to the sponge for every other nail. (Don’t forget to apply one coat of Femme in the middle). Repeat this step 2-3 times for each nail until you’ve reached an ombré effect.Step 6Use a small concealer brush dipped in nail polish remover to clean up the sides and around the cuticles. Finally, lock in and blend that ombré by applying one coat of Seche Vite Fast Drying Top Coat.I LOVE ombré nails! Who else has tried doing ombré nails? Let me know what’s your favorite color combination and what technique has worked for you?
Feathered Manicure

Ciaté London Feathered Manicure
I was intrigued by the feathered manicure nail trend when it first hit the runway. That’s when I first decided to give the feathered manicure nail trend a try. However, I remember the hassle of driving to the arts & craft store to gather all of the supplies. Ciaté took inspiration straight from the runway and made it even easier to achieve the feathered nail look by creating a Feathered Manicure kit ready with all the supplies needed. The Ciaté Feathered Manicure kit allows you to create your own feathered manicure straight from home. The kit comes with different colored feathers to choose from. Customize your feathered nail look by creating a multi-colored feathered manicure. Make your feathered manicure stand out by using a white nail polish as the base.Kit Contains:Speed Coat ProMini Ciaté Paint PotMini ScissorsNail File BlockAssortment of 40 FeathersStep 1Lay out feathers and choose the best sized feather for each fingernail.Step 2Apply two coats of the mini Ciaté Paint Pot allow time to dry.Step 3Apply a generous coat of Speed Coat Pro (one at a time).Step 4Gently lay and press the feather flat onto the nail while still wet.Step 5Allow time to dry and trim any excess feather using Ciate mini scissors.Step 6Apply a second coat of Speed Coat Pro to seal in the feather.Step 7Allow time to dry and use the block file vertically to buff away the excess feather at the free edge.
Enjoy your feathered manicure!

Welcome to Karen G Nails
Welcome to Karen G Nails
in Nails
I'm so excited to announce that my Beauty Blog and Website Karen G Nails is officially LIVE!
It's been a long process, but an amazing journey and I'm thrilled to be launching it on my BIRTHDAY!
Finally, I have a dedicated space share with you all of my tips and tricks, tutorials, beauty DIY, new and favorite products. Also, featuring the latest collections in beauty.
I'm so excited to share all of the projects I'm working on. Feel free to share what types of posts you would like to see or if you have any questions.
Thank you so much for all your love and support. I hope you enjoy my website!
karen g nails signature
#ENAMOREDWITH MARC JACOBS
 I sincerely LOVE Marc Jacobs nail lacquers. I’m obsessed with their entire collection. The packaging is to die for! Everyone I know that comes across my Marc Jacobs collection instantly falls in love with their bottles and colors. They are one of my favorite nail lacquers!Marc Jacobs introduced Enamored Hi-Shine Lip Lacquers and everything about them is stunning from the packaging right down to the formula. The color and shine of these lip lacquers are amazing along with it’s long lasting wearability. So, just like their nail lacquers these are one of my go to items and I always make sure to have a Marc Jacobs lip lacquer.Marc Jacobs created the ultimate shine statement and personally selected three Lip and Nail Hi-Shine Lacquers exclusive pairings.Nail- JEZEBELLip- MOONGLOWNail- PETRALip- LOVE DRUNKNail- LE CHARMLip- UPROAR
  Nail - MADAMELip - HEY YOU
 Nail - SHOW GIRLLip - SUGAR SUGAR
 Nail - WARM BLUELip - FORBIDDEN FRUIT
Donut Nail Art Tutorial
 California Donuts always serves the right amount of delicious inspiration. If you live in the Los Angeles area or anywhere in California you need to come try California Donuts! Their donuts are the best, I can’t even begin to tell you how many of my friends and clients have fallen in love with California Donuts. The best thing about them is they’re open 24/7! You never know when you’ll be craving a donut at 3:00 am, but now you know exactly where to go to satisfy that sweet tooth.One more thing I love about them is their custom made donuts! This is literally the perfect gift for birthdays, anniversaries, graduations or anyone special in your life. Who wouldn’t love someone who spells their name out in donuts?!?! On that note…I love you, California Donuts!
 Last year, I was inspired by their Sprinkle D’ohnut and I couldn’t resist myself to take a bite and make donut inspired nails! I loved creating this nails look and really enjoyed making this donut nail art tutorial for all of you. I hope you enjoy this sweet donut nail art tutorial mani!
 Nail Polish:Ciaté - KISS CHASE 101NCLA x Karen G. - WHITE DECOEssie - GROOVE IS IN THE HEARTSally Hansen - LIGHTENINGZOYA - JOSIEOPI - ATOMIC ORANGEChina Glaze - HELL-YUMSeche Vite - Top CoatTools:Detailing Nail Art BrushStep 1Apply two coats of Ciaté - Kiss Chase allow time to dry.Step 2Sprinkles - Using a small nail art brush dipped in NCLA x Karen G. - White Deco and paint two- three small while lines randomly throughout the nail to create your first set of sprinkles.Step 3[Repeat Step 2] Using Essie - Groove is in the Heart nail polish.Step 4[Repeat Step 2] Using Sally Hansen - Lightening nail polish.Step 5[Repeat Step 2] Using Zoya - Josie nail polish.Step 6[Repeat Step 2] Using OPI - Atomic Orange and China Glaze - Hell-Yum. [*If any of your sprinkles need a little fixing just simply touch up the area using Ciaté - Kiss Chase with a small brush] Finally, lock in those in those sweet sprinkles by applying one coat of Seche Vite Fast Drying Top Coat.
Enjoy your sweet mani and treat yourself to a donut with sprinkles!