 I’m excited to share with you all the latest product from Nails Inc London Paint Can Spray Can Nail Polish! I was immediately intrigued by the product and couldn’t wait to try it.The color I tested was Mayfair Lane which is a light pink almost white with a hint of shimmer.I followed their step by step guide and directions. I noticed the spray can nail polish dried fast and had full coverage with just the first spray. However, I tend to like my nails more opaque so I sprayed a second coat. It was really the perfect polish application. The polish I sprayed on my fingers washed off pretty quick and easy. Be careful when applying the base coat. I wasn’t too careful when I applied the base coat to my nails and accidentally got some on my cuticles. So, I had to clean up around my cuticles.I decided to include my own step by step guide below with their directions along with my images. I hope the guide below makes it easy for you to achieve the perfect polish application using Nails Inc Paint Can Spray Can Nail Polish.Products:Nails Inc Paint Can Spray Can Nail PolishNails Inc 2 in 1 Base and Top Coat
 Steps:Step 1Apply base coat and allow time to dry. (Nails Inc. recommends 2 in 1 base coat and top coat)Step 2Shake Paint Can and spray the polish from a distance of 10-15 cm directly onto the nails. If needed spray a second coat of polish. Allow nails to completely dry.Step 3Apply a top coat and allow time to dry. (Nails Inc. recommends 2 in 1 base coat and top coat)Step 4Fill bowl with soapy water and wash away and gently rub excess polish from the skin and cuticles. If needed use a small concealer brush dipped in nail polish remover to clean up around the cuticles.Step 5Finally, perfectly applied polish! [show_shopthepost_widget id="1556780"]
Tutorials
Art Deco Nails
 I was inspired by art deco when I first created this nail look last year. I loved it so much and promised many of you to do a quick tutorial and show you exactly how I did it. The steps are easy and these art deco nails can easily be done! I will admit my biggest nemesis when it comes to nails is the amount of time it takes for nail polish to dry. I’m trying to learn to be more patient and accept the fact that I need to let my nails dry in between each step…it’s not easy but it can be done! My solution is watching my favorite YouTube beauty gurus in between each step for these art deco nails :) Remember this art deco nails design can be done in any color combination you like so...get creative!
 Tools:Essie - LicoriceZoya - RockyCiate - Power Dressing 063Seche Vite - Top CoatGold Striping TapeNail Art Liner BrushStep 1Apply two coats of Zoya ‘Rocky’ allow time to completely dry.Step 2Using the liner brush paint two black lines using Essie ‘Licorice’ starting at the sidewall of the nail and painting towards the free edge in order to create the perfect peak where the two black lines will meet.
Step 3Fill in the the sides using Essie ‘Licorice’.Step 4Using the liner brush paint two lines using Ciate ‘Power Dressing 063’ starting at one side of the free edge painting towards the middle and drawing another line on the other side painting towards the middle until both lines meet and create a ‘V’.Step 5Fill in the ‘V’ using Ciate ‘Power Dressing 063’ allow time to dry.Step 6Apply two pieces of gold striping tape to outline the ‘V’ shape that was just created. Finally, lock in your art deco nails design by applying one coat of Seche Vite Fast Drying Top Coat.
Tools:Essie - LicoriceZoya - RockyCiate - Power Dressing 063Seche Vite - Top CoatGold Striping TapeNail Art Liner BrushStep 1Apply two coats of Zoya ‘Rocky’ allow time to completely dry.Step 2Using the liner brush paint two black lines using Essie ‘Licorice’ starting at the sidewall of the nail and painting towards the free edge in order to create the perfect peak where the two black lines will meet.
Step 3Fill in the the sides using Essie ‘Licorice’.Step 4Using the liner brush paint two lines using Ciate ‘Power Dressing 063’ starting at one side of the free edge painting towards the middle and drawing another line on the other side painting towards the middle until both lines meet and create a ‘V’.Step 5Fill in the ‘V’ using Ciate ‘Power Dressing 063’ allow time to dry.Step 6Apply two pieces of gold striping tape to outline the ‘V’ shape that was just created. Finally, lock in your art deco nails design by applying one coat of Seche Vite Fast Drying Top Coat.
I hope you’ve enjoyed my art deco nails inspired tutorial and I can’t wait to see your nails!
Strike Gold Nails Tutorial
 I love GOLD! My eyes are immediately drawn to anything in gold. I’ve realized that most my accessories and jewelry are in gold or have at least a touch of gold. So, when I think about my nail designs I try my best to incorporate gold elements into my design.I re-created one of my favorite and simple gold nail looks. Creating this easy Strike Gold Nails Tutorial. This nail look can be done in any base color you prefer! In 4 easy steps you can also strike gold!
 Tools:Deborah Lippmann - Modern LoveElla + Mila - GildedStriping TapeSeche Vite - Top CoatStep 1Apply two coats of Deborah Lippmann ‘Modern Love’ allow time to completely dry.Step 2Cut and apply two pieces of striping tape starting on the sidewall of the nail and taping toward the base of the nail to create the perfect ‘V’.Step 3Fill in the ‘V’ with Ella + Mia 'Gilded' and carefully remove the striping tape while polish is still wet.Step 4 Finally, lock in your nail design by applying one coat of Seche Vite Fast Drying Top Coat.
I hope you enjoy the tutorial below and create amazing strike gold nails!

#ILOVECOCO Chanel LE VERNIS
#ILOVECOCO
CHANEL LE VERNIS
 Chanel sets the standard when it comes to fashion and beauty. Theres no question that Chanel sets trends and throughout the years LE VERNIS style-defining shades have done exactly that.
 I’m excited to share with you the newest collection from Chanel, LE VERNIS Longwear Nail Colour. The formula has been reformulated for a longer lasting, high-shine, 5-free and newly enriched with Bioceramics and Ceramides.
 The formula is set to deliver protective benefits that will strengthen nails and improve the quality of nails over time and selected pigments that offer an even application for a more dramatic lacquered look.The most important step in any manicure is the Top Coat! Chanel has a new LE GEL COAT Longwear Top Coat that extends the wear of LE VERNIS for up to 7 days and will provide a glossy, gel-like finish!How does this work? The clear Top Coat is activated by natural light and bonds to the nail color for flexibility, strength and unprecedented wear.Therefore, Chanel says there’s no need for the UV lamp or the damage to end up with a glossy, gel-like finish.
 Chanel LE VERNIS Longwear Nail Colour comes in 16 shades:SHANTUNGBALLERINA*PIRATE*ROUGE ESSENTIELMONOCHROMECAMELIAORGANDIVAMP*MYTHIQUEROUBACHKAMARINIEREGITANECHAINE ORPARTICULIERE*GARCONNEROUGE NOIRE*[*Bestsellers]
 I’m excited to share with you the new formula from Chanel LE VERNIS Longwear Nail Colour collection and go through the quick and easy steps to achieve the perfect ultra-glossy gel-like finish manicure using Chanel products.
 Step 1Apply one thin layer of Chanel LA BASE PROTECTIVE AND SMOOTHING base coat.
 Step 2Apply two coats of think coat of Chanel LE VERNIS Colour in Rouge Essentiel.
 Step 3Finally, lock in the color using Chanel Le Gel Longwear Top Coat to achieve the perfect gel-like finish.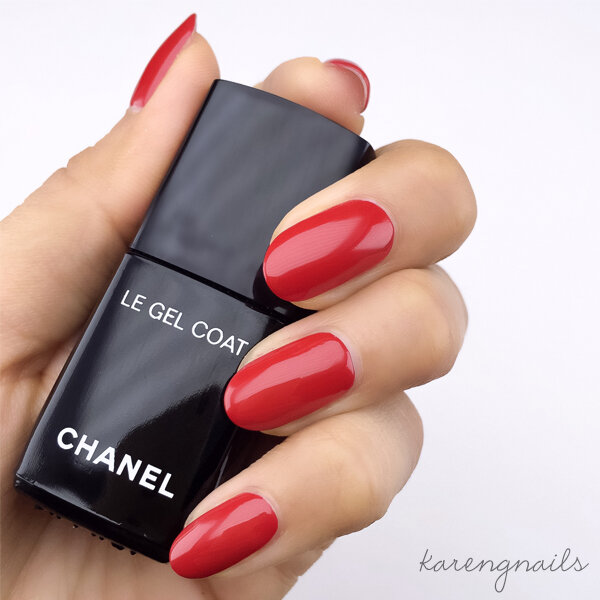
#COCOLOVESLA
CHANEL “I Love Coco Backstage Beauty Lounge”
Go to the link below for a special backstage all-access invite from CHANEL and reserve a spot for you and your friends in advance #COCOLOVESLA Visit: http://bit.ly/ilovecocoeventWhen:Friday, February 26-28Noon - 7pm dailyWhere:Bar Marmont at the Chateau Marmont - 8171 Sunset Boulevard, Los Angeles, California
#COCOLOVESLA
Valentine's Day
 Valentine’s Day is just around the corner and I hope everyone has a special Valentine for this weekend! In the spirit of LOVE, I thought it would be a cute idea to make a Valentine’s Day inspired nail art tutorial.You know the saying, ‘I wear my heart on my sleeve’?… well, I prefer ‘I wear my heart on my fingertips’ Therefore, that was the sheer inspiration for this nail look.I hope you enjoy this Valentine’s Day nail art tutorial and remember to give and receive love everyday of your life!
 Tools:Essie - MinimalisticOPI - Hello Kitty 5 Apples TallDetailing Nail Art BrushDotting ToolSeche Vite - Top CoatSteps:Step 1Apply two coats of Essie ‘Minimalistic’ allow time to completely dry.Step 2Using a dotting tool dipped in OPI ‘5 Apples Tall’ dot 6 circles in the shape of heart to achieve the best heart.Step 3Using a small nail art brush dipped in OPI ‘5 Apples Tall’ connect the dots to form the outline of the heart.Step 4Fill in the heart using OPI ‘5 Apples Tall’.Step 5Finally, lock in your Valentine’s Day nails by applying one coat of Seche Vite fast drying top coat.
Happy Valentine’s Day!

Christmas Red Stocking Nails
 I love christmas stockings! I especially love surprising all my loved ones with red stockings filled with their favorite items. Stocking stuffers are my favorite items to shop for and I always make sure to include an item they can use either on their hands or feet :) For example, some of my favorite stocking stuffers include nail polish, crystal nail files, cuticle oil, nail clippers and fast-drying top coat. I was inspired by all of my christmas stockings to create red stocking nails. Below is a quick and simple nail tutorial to add just a tiny bit of holiday cheer to your nails this season!
 Materials:L’Oreal Extraordinaire Gel-Lacque 1-2-3 - Red-y to Shine?OPI Infinite Shine - Non-Stop WhiteStriping TapeSeche Vite - Top CoatStep 1Use a white and red nail polish to create your red stocking nails.Step 2Apply two coats of OPI Infinite Shine ‘Non-Stop White’ allow time to completely dry.Step 3Apply a piece of striping tape 1/4 away from the base of the nail to create the perfect horizontal line .Step 4Fill in the portion above the striping tape with L’Oreal Extraordinaire Gel-Lacque 'Red-y to Shine?'Step 5Carefully remove the striping tape while polish is still wet.Step 6Finally, lock in your red stocking nails by applying one coat of Seche Vite fast drying top coat.
 I hope you enjoy hanging your stockings and all your sweet stocking stuffers this Christmas!
Ombré Nails

Ombré Nails
One of my favorite nail looks at the moment is Ombré nails. I love doing ombré nails because the color combinations are endless. However, it was once one of the messiest nail looks. The first time I ever did ombré nails I spent over 10 minutes trying to clean up all of the nail polish around my cuticles. So, I tried using scotch tape and Elmer's glue around my cuticles, but none of these methods quite worked for me. I still had a lot of clean up to do and I noticed the nail polish remover was drying out my cuticles!In effort to solve this issue, I started using Dr. Hauschka Neem Nail Oil around my cuticles. This method killed two birds with one stone! The cuticle oil made clean up so much easier with less nail polish on my skin. Plus it didn't dry out my cuticles or fingers. Ever since then creating ombré nail looks has been so much easier.How do I get the ombré effect? To create my ombré nails I use the make-up sponge technique. Below I created a tutorial with all of the steps I use to create ombré nails. Materials:LVX - MyntLVX - FemmeMakeup SpongeDr. Hauschka Neem Nail OilSmall Concealer BrushSeche Vite - Top CoatStep 1Choose two nail polish colors to create your ombre. Unscrew the lids of the polish and leave them open.Step 2Apply two coats of LVX - Mynt allow time to completely dry.Step 3Apply three coats of LVX - Femme to half of the makeup sponge and two coats of LVX - Mynt to the other half.Step 4Using a small concealer brush carefully apply cuticle oil all around the sides and cuticles. Apply one single coat of LVX- Femme toward the middle of the makeup sponge to blend the two colors together.Step 5Grab the sponge and place it directly in the middle of the nail, then gently apply pressure while rocking the sponge back and forth in the same spot. Re-apply the nail polish colors to the sponge for every other nail. (Don’t forget to apply one coat of Femme in the middle). Repeat this step 2-3 times for each nail until you’ve reached an ombré effect.Step 6Use a small concealer brush dipped in nail polish remover to clean up the sides and around the cuticles. Finally, lock in and blend that ombré by applying one coat of Seche Vite Fast Drying Top Coat.I LOVE ombré nails! Who else has tried doing ombré nails? Let me know what’s your favorite color combination and what technique has worked for you?
Feathered Manicure

Ciaté London Feathered Manicure
I was intrigued by the feathered manicure nail trend when it first hit the runway. That’s when I first decided to give the feathered manicure nail trend a try. However, I remember the hassle of driving to the arts & craft store to gather all of the supplies. Ciaté took inspiration straight from the runway and made it even easier to achieve the feathered nail look by creating a Feathered Manicure kit ready with all the supplies needed. The Ciaté Feathered Manicure kit allows you to create your own feathered manicure straight from home. The kit comes with different colored feathers to choose from. Customize your feathered nail look by creating a multi-colored feathered manicure. Make your feathered manicure stand out by using a white nail polish as the base.Kit Contains:Speed Coat ProMini Ciaté Paint PotMini ScissorsNail File BlockAssortment of 40 FeathersStep 1Lay out feathers and choose the best sized feather for each fingernail.Step 2Apply two coats of the mini Ciaté Paint Pot allow time to dry.Step 3Apply a generous coat of Speed Coat Pro (one at a time).Step 4Gently lay and press the feather flat onto the nail while still wet.Step 5Allow time to dry and trim any excess feather using Ciate mini scissors.Step 6Apply a second coat of Speed Coat Pro to seal in the feather.Step 7Allow time to dry and use the block file vertically to buff away the excess feather at the free edge.
Enjoy your feathered manicure!
Donut Nail Art Tutorial
 California Donuts always serves the right amount of delicious inspiration. If you live in the Los Angeles area or anywhere in California you need to come try California Donuts! Their donuts are the best, I can’t even begin to tell you how many of my friends and clients have fallen in love with California Donuts. The best thing about them is they’re open 24/7! You never know when you’ll be craving a donut at 3:00 am, but now you know exactly where to go to satisfy that sweet tooth.One more thing I love about them is their custom made donuts! This is literally the perfect gift for birthdays, anniversaries, graduations or anyone special in your life. Who wouldn’t love someone who spells their name out in donuts?!?! On that note…I love you, California Donuts!
 Last year, I was inspired by their Sprinkle D’ohnut and I couldn’t resist myself to take a bite and make donut inspired nails! I loved creating this nails look and really enjoyed making this donut nail art tutorial for all of you. I hope you enjoy this sweet donut nail art tutorial mani!
 Nail Polish:Ciaté - KISS CHASE 101NCLA x Karen G. - WHITE DECOEssie - GROOVE IS IN THE HEARTSally Hansen - LIGHTENINGZOYA - JOSIEOPI - ATOMIC ORANGEChina Glaze - HELL-YUMSeche Vite - Top CoatTools:Detailing Nail Art BrushStep 1Apply two coats of Ciaté - Kiss Chase allow time to dry.Step 2Sprinkles - Using a small nail art brush dipped in NCLA x Karen G. - White Deco and paint two- three small while lines randomly throughout the nail to create your first set of sprinkles.Step 3[Repeat Step 2] Using Essie - Groove is in the Heart nail polish.Step 4[Repeat Step 2] Using Sally Hansen - Lightening nail polish.Step 5[Repeat Step 2] Using Zoya - Josie nail polish.Step 6[Repeat Step 2] Using OPI - Atomic Orange and China Glaze - Hell-Yum. [*If any of your sprinkles need a little fixing just simply touch up the area using Ciaté - Kiss Chase with a small brush] Finally, lock in those in those sweet sprinkles by applying one coat of Seche Vite Fast Drying Top Coat.
Enjoy your sweet mani and treat yourself to a donut with sprinkles!
Minions Nail Art Tutorial
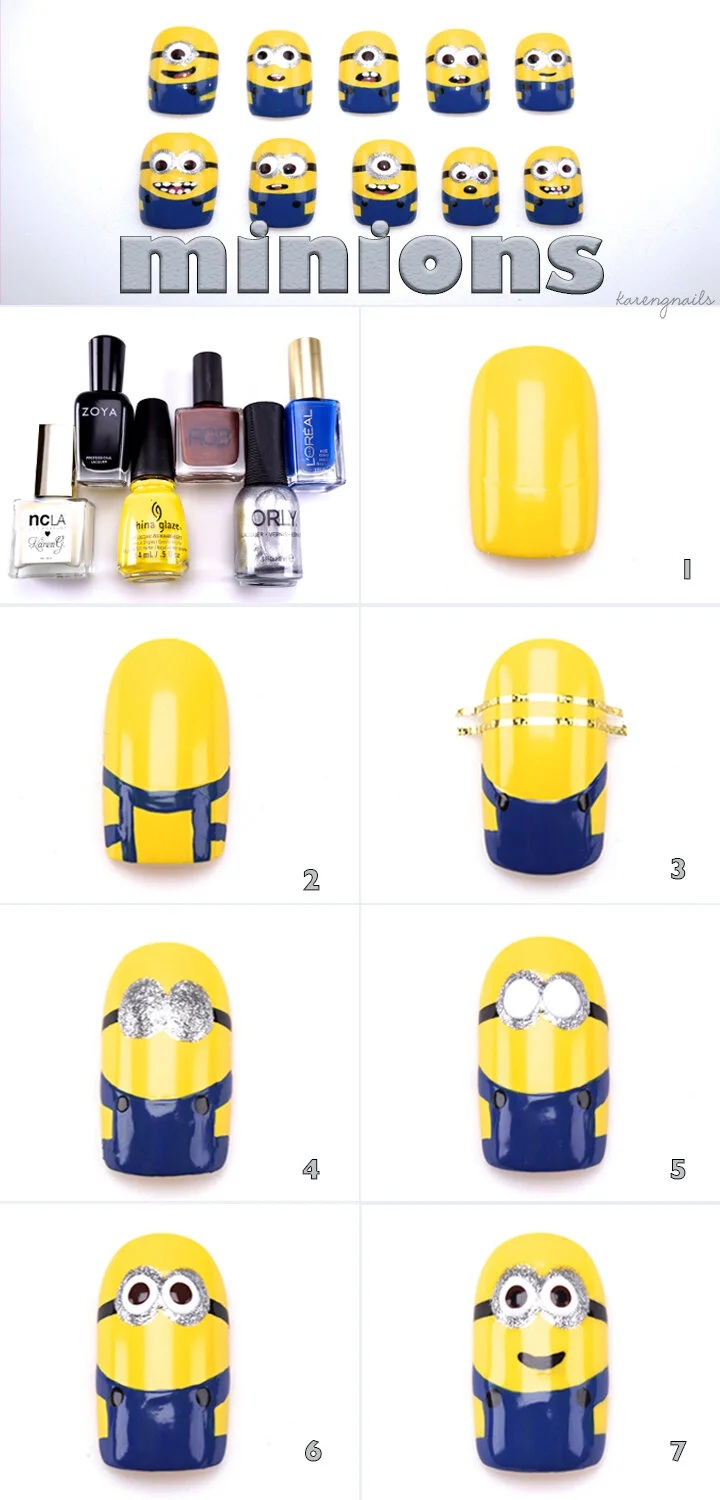
 I first fell in love with minions in ‘Despicable Me’. I was thrilled when I heard they got their own movie and I couldn’t wait to see it! Personally, I loved the ‘Minions’ movie and I think they’re so adorable especially when I can’t understand what they’re saying. Therefore, I was so excited to make minion nails!I made my first set of minion nails for my friend, Katie. Thank you so much, Katie, for the minions nail art inspiration! I had no idea how I was going make minions nails, but I started by picking the colors and gathering my tools, then it was time to get to work. I soon discovered that these little minions were pretty easy to make; however, they did require several steps but nothing too difficult. That’s when I thought it would make a great minions nail art tutorial. I had so much fun giving each minion different facial expressions. I’m so excited for you to make your very own minions! So, get creative and make your favorite minion…Kevin, Stuart or Bob!
Polish and Tools:
Nail Polish:China Glaze - HAPPY GO LUCKYL’Oreal - Jet Set to ParisZOYA - WillaNCLA x Karen G. - White DecoOrly - ShineRGB - CognacSeche Vite - Top CoatTools:Dotting ToolsDetailing Nail Art BrushStriping Tape
How to:
Step 1Apply two coats of China Glaze - Happy Go Lucky allow time to dry.Step 2Overalls - Start by creating an outline using a nail art brush dipped in L’Oreal - Jet Set to Paris. Create the neckline by starting on one side of the nail and sweeping the brush towards the other side. Make two vertical lines on each side of the nail and a horizontal line in between the neckline and free edge. Once you’ve completed your outline fill in the middle and sides using Jet Set to Paris.Step 3Goggle strap - Use striping tape to create the perfect horizontal line. Fill in with Zoya - Willa black nail polish and carefully remove the tape while polish is still wet. Use a small dotting tool dipped in black nail polish to create two buttons on the overalls.Step 4Eyes - Using a large size dotting tool make two silver dots using Orly - Shine.Step 5Eyes - Using a medium size dotting tool make two white dots using NCLA x Karen G. - White Deco inside the silver dots.Step 6Eyes - Using a small size dotting tool make two brown dots using RGB - Cognac inside the white dots.Step 7Eyes & Smile - To complete the eyes use the smallest size dotting tool make two small black dots using Zoya Willa inside the brown dots. Using the same black nail polish and nail art brush carefully create the minions smile. Finish and lock in your minions nail art design by using Seche Vite Fast Drying top coat.