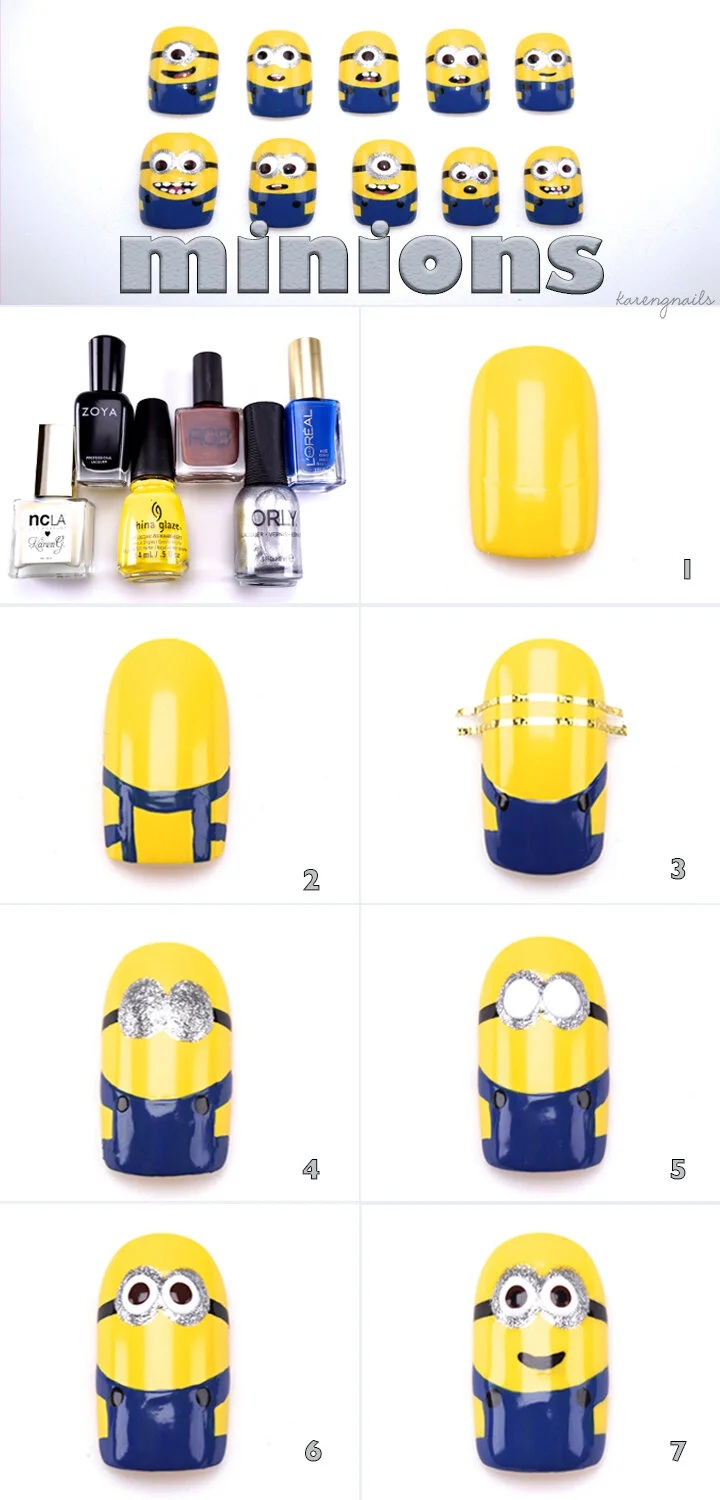
 I first fell in love with minions in ‘Despicable Me’. I was thrilled when I heard they got their own movie and I couldn’t wait to see it! Personally, I loved the ‘Minions’ movie and I think they’re so adorable especially when I can’t understand what they’re saying. Therefore, I was so excited to make minion nails!I made my first set of minion nails for my friend, Katie. Thank you so much, Katie, for the minions nail art inspiration! I had no idea how I was going make minions nails, but I started by picking the colors and gathering my tools, then it was time to get to work. I soon discovered that these little minions were pretty easy to make; however, they did require several steps but nothing too difficult. That’s when I thought it would make a great minions nail art tutorial. I had so much fun giving each minion different facial expressions. I’m so excited for you to make your very own minions! So, get creative and make your favorite minion…Kevin, Stuart or Bob!
Polish and Tools:
Nail Polish:China Glaze - HAPPY GO LUCKYL’Oreal - Jet Set to ParisZOYA - WillaNCLA x Karen G. - White DecoOrly - ShineRGB - CognacSeche Vite - Top CoatTools:Dotting ToolsDetailing Nail Art BrushStriping Tape
How to:
Step 1Apply two coats of China Glaze - Happy Go Lucky allow time to dry.Step 2Overalls - Start by creating an outline using a nail art brush dipped in L’Oreal - Jet Set to Paris. Create the neckline by starting on one side of the nail and sweeping the brush towards the other side. Make two vertical lines on each side of the nail and a horizontal line in between the neckline and free edge. Once you’ve completed your outline fill in the middle and sides using Jet Set to Paris.Step 3Goggle strap - Use striping tape to create the perfect horizontal line. Fill in with Zoya - Willa black nail polish and carefully remove the tape while polish is still wet. Use a small dotting tool dipped in black nail polish to create two buttons on the overalls.Step 4Eyes - Using a large size dotting tool make two silver dots using Orly - Shine.Step 5Eyes - Using a medium size dotting tool make two white dots using NCLA x Karen G. - White Deco inside the silver dots.Step 6Eyes - Using a small size dotting tool make two brown dots using RGB - Cognac inside the white dots.Step 7Eyes & Smile - To complete the eyes use the smallest size dotting tool make two small black dots using Zoya Willa inside the brown dots. Using the same black nail polish and nail art brush carefully create the minions smile. Finish and lock in your minions nail art design by using Seche Vite Fast Drying top coat.

 When life gives you lemons…what do you do?!?Well…I make nails inspired by lemons and eventually lemonade.To be honest in the midst of doing my lemon inspired nails I started craving lemonade. I took a quick break and decided to make a pitcher of fresh squeezed lemonade. I used the same quick recipe my mother and I used to make lemonade all summer long when I was growing up. Treat yourself and friends to a pitcher of lemonade and enjoy a glass as you give yourself or friends a sweet mani.
 INGREDIENTS1 1/2 cup of Fresh Squeezed Lemons (approx. 6-8 lemons)1 1/2 cup of Sugar5 cups of WaterDIRECTIONS1. Pour 1 1/2 cup of sugar into 1 cup of hot water, stir well until sugar dissolves (allow time to cool)2.

 Growing up I despised filing my nails! I use to cut my nails with a nail clipper or I hate to admit I would bite them…yes, I was a nail bitter! I always thought nail files were either to rough or to flimsy. So, I didn’t even bother filing my nails and left that to the professionals. However, it wasn’t until I was in beauty school that I learned about nail files with different grit sizes. I was amazed to learn that there were different files for different purposes. I was extremely happy to discover that not all nail files felt like sand paper and I would no longer had to suffer. I figured out that the file I was using as a teenager was only meant to be used on acrylics and never on my natural nails *ouch!* I never knew this because growing up a lot of the emery boards I had never seem to have the grit sizes written on them. Therefore, I would invest in emery boards or files that specify their grit sizes and purpose on the packaging.What are grits in a nail file? Nail files have grits just like sand paper and they are measured by the amount of grit they contain in a square inch. So, the lower the grit size in a file the more coarse and rough the nail file will be. The higher the grit size in a file the more fine and softer the nail file will be.There are many different types of nail files to choose from and each one is designed for a different purpose. So, don’t grab just any file, but select the best nail file to work with. For example you wouldn’t want to grab any curling iron size if you were trying to achieve a specific hairstyle. Take into consideration your nail type and prevent damage to your nails by using the right nail file.NAIL FILES & GRITS80-100 80-100 grit files are used to remove, shape or reduce length of acrylics. This file should only be used on artificial nails and never on natural nails. This file is way too (coarse) harsh for natural nails. I would not recommend using this file, since you can run the risk of cutting the skin, and should ideally only be used by a trained professional.
  CND -
CND -  Young Nails -
  Tweezerman -
  Young Nails -
  Tweezerman -
  OPI -
OPI -  Young Nails -
  CND -
CND -  OPI -
OPI - Ex: CND -
  Young Nails -
  OPI -
OPI -  CND -
CND -  OPI -
OPI -  Deborah Lippmann -


